I have used Spycam systems in the past for watching my car in the office car park, keeping eye on my nephew whilst I work and I have even used it before for keeping eye on my backup servers in the past; the common problem I always come across is either the product it’self is expensive with no support from manufacturer or the product is not accompanied with it an iPhone or Android app for remote access, because I’m sure you will agree a Spycam is no use if you can’t watch remotely.
SpyCam Watcher is the lowest cost, easiest to use Digital Video Recorder (DVR) for USB Webcams and Network Cameras; It combines Windows-based monitoring and recording software with iPhone/iPad-based remote viewing.  SpyCam Watcher works with a wide range of network cameras and webcams from over 50 manufacturers. And with SpyCam Watcher Remote Controlfor iPhone/iPad you can monitor your home’s front yard or your company’s lobby or parking lot, from anywhere in the world.
Using the SpyCam Watcher software
Installation process was smooth; all that needed doing was download the small 8.7MB file and hit the install button and some licence agreements to accept. Â Once loaded up you can go ahead and either use in demo mode, although the demo mode will not give you any usage as such you are better purchasing the licence for just $9.90 (price offer for May so hurry up). Â Enter your registration and licence information and you are ready to set up your camera. Note: During installation, your Firewall may try to block it but don’t worry, go ahead and allow access as it’s a safe software.
SpyCam doesn’t require you to spend extra money on a camera if you already have yourself a USB webcam.
Adding you Camera
Select the Edit option >> Edit Camera
The next screen that comes up has lots of options, but don’t let it phase you because you only need to select some of the options that apply to you. Â I only used some of the options for the purpose of this review but feel free to play around with some of the other options available. Â On the screen select Camera Type drop down option and select standard webcam, but if you have other type of cameras, look through the list as they have a database of various manufacturers.
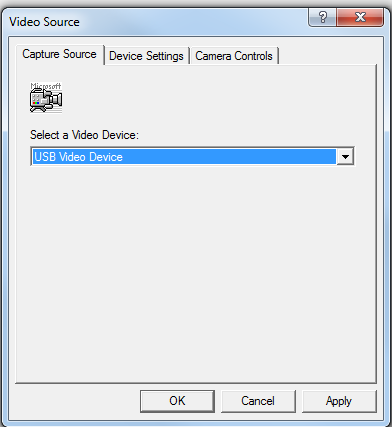
After you have selected the Camera Type, you then need to make sure the drivers are in; hitting the VFW Source button brings up another screen where you select the Video Device, there you just need to select USB Video Device and you should now start to see picture from you web camera. Â Notice the other two tabs available, the Device settings and Camera Controls; those allow you to add some personal touches like brightness, contrast, focus, exposure etc.
Once you are set, you now need to click the Start button at the top menu area:
Now you are set, but one more thing is recording the footage if you like to view another time. The little red quare which is the 5th button from the left, is the button you need to select to start recording footage of your location, you also have the stop button, play button, Camera recording on motion and camera recording off motion(those are useful if you only want to activate based on motion detection).  What I found useful for the tech people is the frames per second information to help change settings accordingly.  You also have the pan/zoom button which is great for checking detail out at the location if you receive an alert.
If you have recorded your clip, you can view them by selecting the Recordings tab which also shows you where they are been stored, but note that you can change that location to a shared drive or where suitable for your scenario.
The recordings are stored in hourly block so it’s easier to select which time frame you would like to view, and opening up the block of time frame gives you option to speed up the video, change to frame, print frame, save file, insert captions, convert to AVI format.  The software has so many options to get you going and all set up for securely monitor what you like making it a good product for Home, office or even corporate environment use.
Other options include setting alarm settings, setting tripwires and also setting up your remote connection for iPhone/iPad access.
How to configure Remote Access on your LAN
—  Go to  File >> Preferences, and go to Remote access tab
- Allow remote access : check
- Remote access password : this must match what you enter on the iPhone side.
- iOS access port : suggest you leave at 81 unless that is being used. Or try 82, 83, etc
- click OK and restart the program.
Now you need to find out the IP address of your PC. You can open a command prompt and type IPCONFIG and this will tell you. Usually it will be something like 192.168.0.111
On the iPhone, run Spycam Watcher Remote Control and click Configure
- Remote Host address : put in the IP address of your PC
- Port : same port as above, typically 81
- Username : can be anything
- Password : must match above
That will let you connect over your own LAN to the PC
Pros
- It’s cheap to buy
- Easy to configure
- You can connect to your system via iPhone/iPad
- It works!
- Can use with your webcam so no extra purchases
- Non intrusive so the software can be hidden in the system tray and you can easily start and stop the camera from there too.
- Can be stored via FTP
Cons
- Too many options can be confusing for not so tech savvy users
- Not compatible with Mac
Where to buy
Visit SpyCam website and pick up the Full Version


